
This is UltimateRPA Documentation
The Inspector may not find GUI elements for some applications that don't support GUI layers to identify elements. In this case we may use images to identify GUI elements on an application screen. The robot then identifies a GUI element by matching the image patterns on the application window.
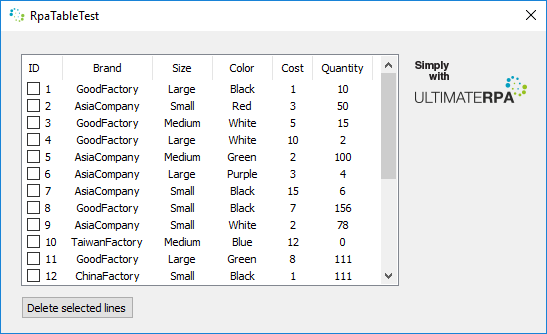
We will try out this method on RpaTableTest application. First, prepare the code to run the application.
The path to an app "TutorialApps/RpaTableTest.exe" is relative to the script file directory. The above code assumes that the script is placed in the main directory of UltimateRPA tools. If your script is saved elsewhere, remember to change the path.
The method visual_data from the class AppElement creates the image of the GUI element for which it is invoked. In our example, we save RpaTableTest's "Simply with UltimateRPA" image in the file simply.png. In Inspector, prepare the expression app.find_first(cf.image()) and assign it to the image variable. For the image variable, then invoke the method visual_data, and set the format argument to it to png. Please note: not all UltimateRPA methods support keyword arguments, but the method visual_data is capable of this invocation approach, so you can use it. Save the output from the method visual_data in binary mode to the file called simply.png.

If, after running the script, you look in the directory where the script is saved, you find an image called simply.png.
The method visual_data has one more optional argument called rect. This method takes a tuple containing four integer values as a parameter, which can define the picture cutout from the upper left corner of the GUI element for which the method has been invoked, in the following order: left, upper, right, bottom corner. For example, it may look like this: gui_element.visual_data(rect=(0, 0, 10, 10)). The cutout need not be only from the selected GUI element, but it may overlap it or even be completely away from it.
Use the method find_first_visual to find an image in the application. We use the simply.png image created in the previous example. First, enable the debugging mode set_debug_mode. Then, using Inspector, create an expression to find the entire application window and assign it to the window variable. Finally, invoke the method find_first_visual with a single argument, i.e. the path to the simply.png image, for the window.

Run the robotic script. RpaTableTest is launched. Because the debugging mode is enabled, a green frame is displayed, showing the application window found. The frame then changes to red, indicating the region in which the image is searched. If this argument is not specified, a search is conducted throughout the GUI element for which the method find_first_visual is invoked. In this particular case, then, you are searching for the image in the entire application window. Eventually, the "Simply with UltimateRPA" image is highlighted with an orange frame.
The search for the visual element can be narrowed and specified by using the region argument of the method find_first_visual. You can specify the region inside which the GUI element must be searched for. The region argument has the value set (left, upper, right, bottom). The following example demonstrates the region argument's use.

If you run the above code, you can see that the red frame is smaller than in the previous case.
If you define the region so that the image you are looking for cannot be found, the script ends with the error ElemenetNotFoundError. See the next example.
The method find_first_visual returns an object of the class VisualElement. We can use this to interact in the same way as with objects of the class AppElement. Again, we demonstrate this in the following example with RpaTableTest. When using the class VisualElement, mark all of the checkboxes. First, create the checkbox image you are to look for. This time, do not save this image in a file, but directly use the byte array returned by the method visual_data. It is not necessary to select the checkbox exactly, value (0, 0, 17, 17) is good enough. Next, assign the expression to find the table app.find_first(cf.list()) to the table variable. For the table variable, instead of the method find_first_visual, invoke find_all_visual, which returns a list of objects of the class VisualElement matching the image stored in the visual_data variable. Finally, go through the list in the cycle and, for each item, invoke the method send_mouse_click, which mouse-clicks on the checkbox.

Inspector makes it easy to work when, in robotization, you can only identify GUI elements via images. The following sections present three examples of creating an image with Inspector. For demonstration purposes, we reuse the RpaTableTest application in the TutorialApps directory, running it without robot help.
To create a new image with Inspector, first enable the Capture Visuals button next to the Inspector crosshairs. Next, in the RpaTableTest application, use the Inspector crosshair to select the ID inscription in the upper left corner of the RpaTableTest table.

This GUI element is your reference point for finding an image. Using the checkbox in the CF column, identify the GUI element, for example, as follows: app.find_first (cf.name ("ID")). Then switch to the VisualElement tab, where you see a RpaTableTest screenshot and a green frame indicating the GUI element. You can hide the framing of elements with the Show/Hide highlight tool in the toolbar to the left of the canvas.
Use the Select pattern tool to select the first checkbox in the table. Use the Save pattern tool to save the pattern as a checkbox.bmp file. You can use the scroll wheel and CTRL key or slider to zoom in, as this makes selecting the square easier. As mentioned above, if no region parameter is passed to the method find_first_visual, the search is conducted in the GUI element for which you invoke the method. In our case, the search would take place in a table cell with an ID value in which there is no checkbox, and as a result, the search would end with the exception ElemenetNotFoundError.

Therefore, use the Select region tool to define the area in which the pattern search will be run. Select approximately the first column of the table that contains checkboxes. To select the area of a region precisely, adjust the values in the status bar below the canvas. Here, you can precisely set the pixel values from the top left corner of the selected AppElement, sequenced as left, top, right, bottom.

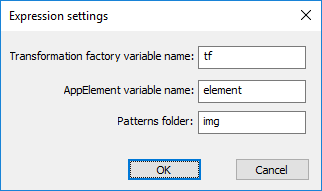
At the bottom of Inspector, marked Expression, an expression is generated that you can use in the robotic script. It is important to set the correct path to the image so that the robot can find it. You can modify the path directly in the code or set the path in the Expression settings window, which you open with the gear button located on the right, above the Expression field. In the Type of action combo box, select what method you want to invoke for the found VisualElement. Select send_mouse_click. You can verify that you have created a functional expression via the Highlight expression button. This shows you, in the robotic application, what the expression finds. Highlight expression does not exactly match the expression that you have generated. It is intended only for an initial check that you are doing it right.
The code generated for our example should look something like this. Do not forget to set the path to the checkbox.bmp image appropriately to the actually saved image.
Sometimes, in robotization, cases arise where you search for the same pattern on different screens or even in different applications. In this situation, there is no need to select and save the pattern again. Instead, you can load the image with the Load pattern tool. Again, we will try out this on RpaTableTest. Start by proceeding in the same way as when you create a new visual, but select Load Pattern instead of Select Pattern. In the Open dialog box, find the checkbox.bmp image that you created in the previous example. If the recorded pattern is found on the canvas, it is marked. Inspector first tries to find the pattern in the region or in AppElement. If this fails, it searches the entire screenshot. After the pattern has loaded, an expression is generated in the Expression python field. You can paste this into the code or modify it to get the result you want.

You can use an application screenshot directly to find and simulate the GUI element actions. We recommend using this method only when you are out of options since the visual screen may be inaccurate.

After running Inspector, switch it to the VisualElement tab and enable the Load Screenshot button in the toolbar. In the Open dialog box, select the screenshot from which you wish to create an image. The screenshot opens on the canvas and you then define the AppElement with the Select AppElement tool. When you have selected the AppElement using Select AppElement, you can edit the AppElement values in the status bar. As all other coordinates are relative to the top left corner of the selected AppElement, the accuracy of the visual test is one of the fundamental factors determining exactly how you choose this corner. If you use Load Screenshot, you can not use the Highlight expression tool.

Transformation in the UltimateRPA tool is used to color the pattern and the screen. This allows you, for example, to have a single pattern set for different color bit depths. Save the pattern as you actually see it on the monitor. Transformations are carried out by the transformations parameter of the methods find_first_visual or find_all_visual. When this function is invoked, it transforms the pattern and the current screen. To define transformations more easily, you can use Inspector, where the Transformation tool is located on the VisualElement tab.
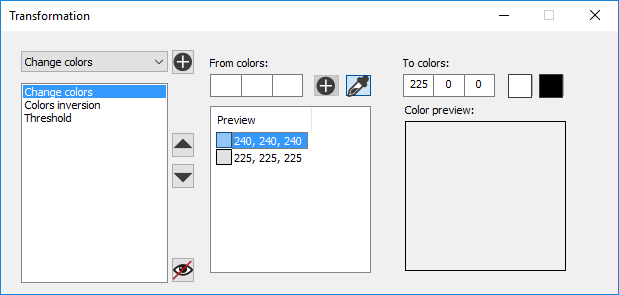
UltimateRPA is capable of three basic color transformations

Several image colors can be converted to another using the method change_colors. This method expects two parameters, i.e. from_colors and to_color. The from_colors parameter is a list of RGB-formatted colors, e.g. from_colors = [(255, 0, 0)], that you wish to change. The to_color parameter defines the color you wish to convert the listed colors to, e.g. to_color = (0, 0, 0).

In the transformation settings in Inspector, select change_colors in the combo box and add it to the list with the plus button. The set-up form is displayed. You can add colors to the From colors table with the eyedropper (the eyedropper collects colors only from the Inspector canvas), or by filling in the text boxes with the color value and pressing the plus button. The color list makes sure that colors are not duplicated. If you wish to remove a color from the list, select it and press the Delete key. In the part marked To color, fill in the color you wish to convert the colors to. The two most common colors, white and black, have been pre-defined as buttons for you. If you want to verify what color change looks like, you can examine the preview after activating the eye button next to the transformation table.
Use colors_inversion to invert colors.

Color inversion does not allow for any additional settings.
If you wish to convert an image to just black and white (bitmap), use threshold. This method has one parameter, which indicates the ratio at which colors are to be split into black and white.

The threshold settings contain only a text box to set the color distribution ratio. This parameter is a decimal number from zero to one.
Transformation factory works in much the same way as condition factory. In the transformation factory, it depends on the order in which the transformation methods are called. The transformations are made in that order. There is a difference if threshold is the method performed first, and then the color is changed by the change_colors method. The change_colors method is the only one that makes sense to be listed multiple times in Transformation factory.
Example of what the transformation code could look like.
The above transformation first converts red, green, and blue to white. The colors are then inverted. Finally, the image is converted, via the threshold method, into a bitmap (white and black only).